
Maybe you’ve noticed that your first Gunpla doesn’t look as good as the photo on his box. One of the easiest ways to make your Gunpla look nicer with not much effort is to do panel lining.
Panel lining is the process of drawing fine lines around the detailing of model parts. It is one of the simplest things you can do to really make your Gunpla pop.
You’re not just drawing lines onto a Gunpla, you’re giving contrast to all the little pieces that aren’t defined individually, making your Gunpla look like it’s made up of more parts than it actually is. Notice how the lining on the pieces below makes you notice the existing details on the piece that were nearly invisible before.

First, we line the part, drawing directly into the groove on the piece. You’ll want to line inside or next to protrusions on the piece that could benefit from extra definition.
For providing realistic looking contrast, color choice is important, too. The color of the pen you use for detailing is dependent on the color of your model. The idea is to make it look like light is casting a shadow on the Gunpla, so the color you use for panel lining should be a darker version of the color of the piece.
Use a gray marker (GM02) to draw detail lines on white or light gray Gundam pieces.
Use a black marker (GM01) for detailing on blue or dark gray Gundam pieces.
Use a brown marker (GM03) for detailing warm colors like red or yellow.
This is a white piece, so you can use a gray marker (GM02) to line it.

Panel lining is the process of drawing fine lines around the detailing of model parts. It is one of the simplest things you can do to really make your Gunpla pop.
You’re not just drawing lines onto a Gunpla, you’re giving contrast to all the little pieces that aren’t defined individually, making your Gunpla look like it’s made up of more parts than it actually is. Notice how the lining on the pieces below makes you notice the existing details on the piece that were nearly invisible before.
However, if you’ve never done it before, it might seem a little intimidating to draw on the Gunpla you’ve spent so much time on. What if your hand shakes? What it ends up looking terrible?
Don’t worry, we’ve done all that trial-and-error for you. After a few funny looking Gunpla, we’ve figured out an effortless, two-step process that makes our Gunpla look surprisingly pro without painting.First, we line the part, drawing directly into the groove on the piece. You’ll want to line inside or next to protrusions on the piece that could benefit from extra definition.
For providing realistic looking contrast, color choice is important, too. The color of the pen you use for detailing is dependent on the color of your model. The idea is to make it look like light is casting a shadow on the Gunpla, so the color you use for panel lining should be a darker version of the color of the piece.
Use a gray marker (GM02) to draw detail lines on white or light gray Gundam pieces.
Use a black marker (GM01) for detailing on blue or dark gray Gundam pieces.
Use a brown marker (GM03) for detailing warm colors like red or yellow.
This is a white piece, so you can use a gray marker (GM02) to line it.
Second, we soften the line. You’ll notice that when you straight-up line a piece, the result can be a bit harsh. So to make it look more natural, you’ll want to rub it with something you probably already have around the house a cotton swab. Some people use rubber erasers, too.

The final effect: a lined piece with just enough contrast to draw your eye.
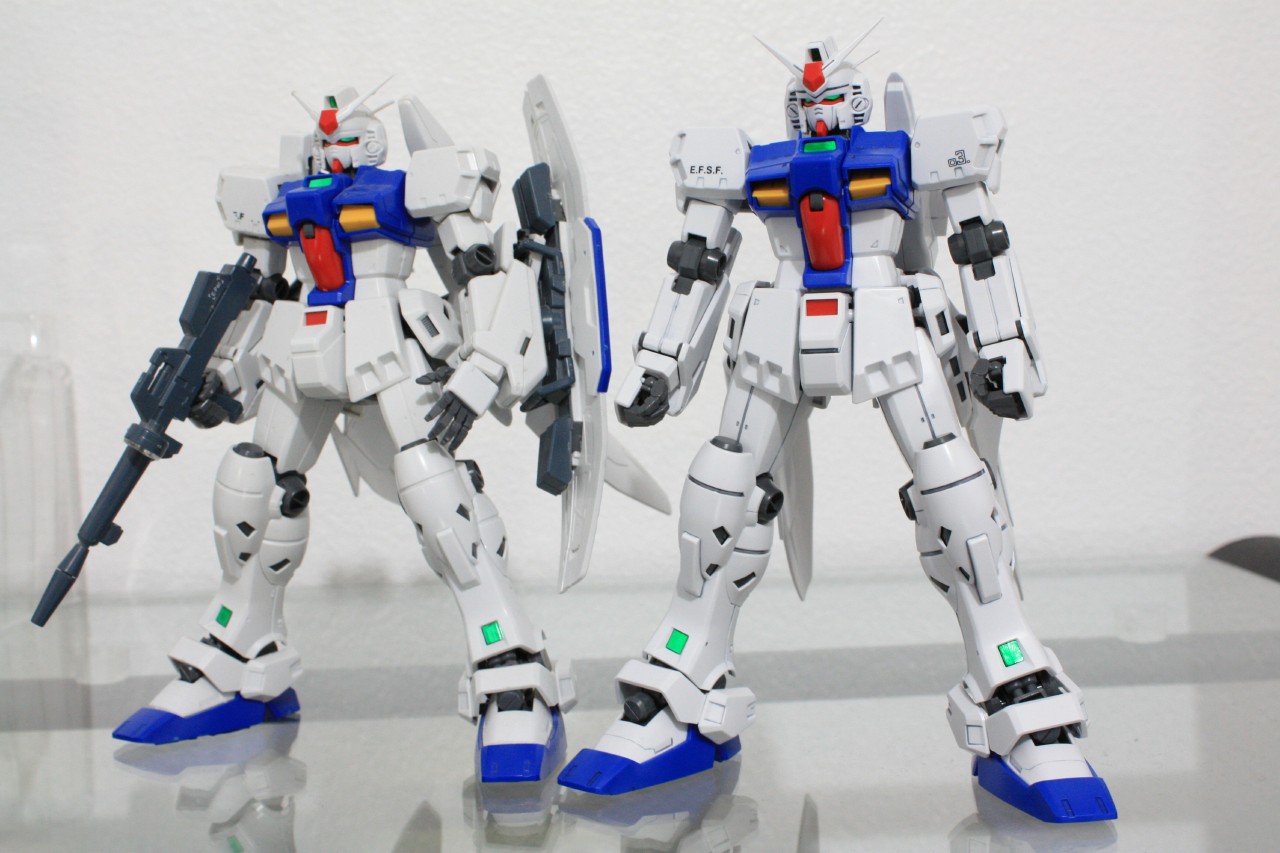
Here the panel lining is barely noticeable it simply serves to enhance the model’s contrast. John used a brown marker on the red and yellow pieces, a gray marker on white, and a black marker on blue. The result is a high definition finish.
Here the panel lining is barely noticeable it simply serves to enhance the model’s contrast. John used a brown marker on the red and yellow pieces, a gray marker on white, and a black marker on blue. The result is a high definition finish.
No comments:
Post a Comment